I visited a couple of times New York and, the more I do it, the more I find it amazing. There is something there that attracts, not only me, but millions of mes to its architecture, way of living, vibrant life, the colors... My closest explanation to what I feel about New York is the atmosphere or maybe the magnetism that only our inner selves are capable of understanding.
Being what it is, I always try to take zillions of pictures from as many aspects I find attractive (as though something there would not be appealing to a photographer!...). Once, we were walking near the Central Park (my wife and I), when we saw a building with the doors wide open that seemed to be inviting for some exploration and some pictures. Carefully, we looked around and climbed to the fourth floor where I saw the inner part of building built in such a way that it lets the internal windows to breath a bit. It was a confusion of small windows, wires and air conditioners. I thought it would be a nice place of a HDR (more about it later) and I managed to hold my camera steady enough through the cracks of the hall window. There are the pictures I took there before we saw somebody coming along and politely asking, without making an effort to hide suspicion, what were we doing there. Anyway, here are the three pictures that I took:
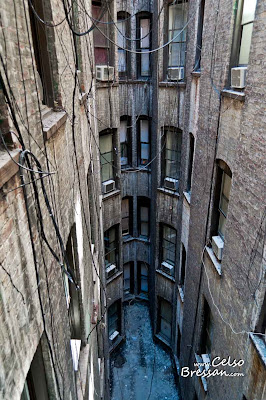 |
| The "right"exposure, that is, the one I set as the correct one (normal exposure). |
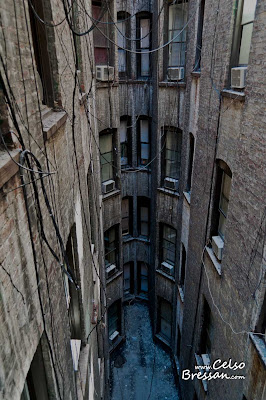 |
| The same scene taken one f-stop below (underexposed). |
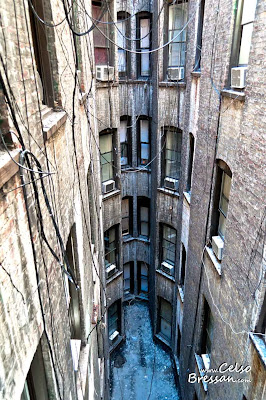 |
| The third picture with one f-stop above (overexposed). |
At first, I did not pay much attention to that blue area in the bottom center of the pictures as I thought it would be a lack of white balance correction. Without further ado, I ran this set through Photomatix and look what I got after working it a bit in Photoshop CS5:
 |
| The blue are like a cold beam flowing from top to bottom. |
Isn't it impressive? It seems that there is a blue beam flowing from top to bottom (or the opposite, if you want this way). I would credit this blue effect to the incorrect white balance but I tried to do it in one of the original pictures and the effect was still there with less intensity, but still clearly there.
Bottom line, where is this effect coming from? What Photomatix only did was to intensify it. All I can say is that it is rather peculiar! If anyone knows how to explain it, please, by all means I will gladly hear it.
Since I was with my hands on it, I played a bit more and I got these two variations. I don't know whether they are pleasant or not.
 |
| A dark vision with the beam intensified. |
Oh! I was forgetting... There is something missing in this picture. If you didn't realize it so far, it is Captain Kirk that was just beamed up by Scotty!
Where to Go From Here
If you are interested in more details about what I talked about, here are some tips on where to start getting acquainted with HDR:
. HDR in brief words, it stands for High Dynamic Range which is a set of procedures capable of presenting a broader range of luminance between the darkest and brightest areas in a picture. Although discovered and investigated around 160 years ago, it was only with digital imaging that its full capabilities could have been explored. Basically, it relies on the fact that human eyes can capture luminances between 10 and 14 f-stops whereas normal cameras can only capture around 5 f-stops. This means that if a scene is captured for the highlights, the medium and low luminances will have reduced presence; if captured for the low luminances, the high and medium will also suffer. By taking a series of pictures in succession of exactly the same scene, typically 3, one for the highlights, one correctly and the last one for the shadows and then later combining these pictures, the resulting image will have richer details and much higher tonal ranges. The HDR technique can be perfected by taking 5, 7 or more pictures, each one 0.5 or 1 f-stop apart from the other. If you look for the keyword HDR on the Web, you are going to find thousands of examples and many good articles about it;
. Photomatix is one of the leading pieces of software that is used to combine the above described exposures to produce HDR images. You can download a trial version and get additional information about HDR
here.


